
Latest 8 Panoramas
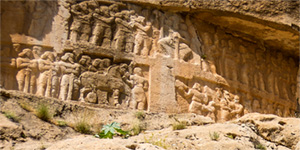
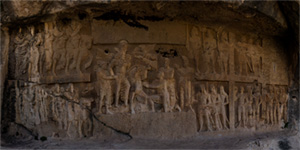
The sixth and youngest Sasanian rock relief in the Tang-e Chowgan gorge, Bishapur was made for the Sasanian king Shapur II (309-379) and shows the suppression of a revolt.
The relief has two registers. The king is sitting on his throne in the center of the upper register, his hand on his sword. From the right, soldiers come closer. They bring prisoners, among which Iranian noblemen can be recognized. In the lowe register, someone is offering the head of a decapitated enemy. There's also an elephant, which suggests that Shapur's victory was won in one of the eastern parts of the Sasanian Empire.
The fifth Sasanian rock relief at Bishapur -chronologically, the fourth- is a classical representation of an investiture, this time of king Bahram I (273-296). There is a close parallel to the relief of the Investiture of Ardashir I at Naghsh-e Rostam and of Shapur I at Naghsh-e Rajab.
The scene is typical. From the left, the supreme god Ahuramazda approaches the king and gives him the ring of power, the cydaris. There is a diadem tied to it. To the right, we see Bahram accepting the cydaris. Bahram is represented as a conqueror, with a defeated enemy underneath his horse. Like two other monuments on the north bank of the Tang-e Chowgan, the fifth relief is also damaged by the aqueduct that used to be there. It was removed in the 1970s.
The fourth Sasanian rock relief at Bishapur -chronologically, the fifth- was made for king Bahram II (276-294) and shows how he receives a delegation of Arabs. The course of the old aqueduct, which has damaged three of the reliefs on this side of the river, is clearly visible.
The Arabs are recognizable on this relief because they are accompanied by a dromedary. King Bahram II can be recognized by looking at his winged crown.
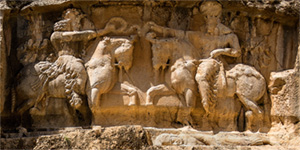
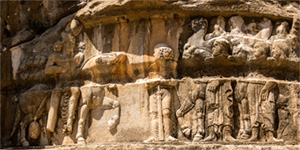
The third relief at Bishapur's Tang-e Chowgan has five horizontal registers. Like reliefs one and two, it was made by the Sasanian king Shapur I (241-272). In the center, we see Shapur's triple victory, which was also the theme of the second relief at Bishapur, and is depicted in Naqhsh-e Rostam too.
Underneath the king's horse, we see the Roman emperor Gordian III, who was killed in 244; elsewhere, we recognize Philippus Arabs, who was made emperor by Shapur; and to the left, we see the captured Valerian. These figures are very damaged, but it is obvious that the design is a copy of the relief at Naghsh-e Rostam.
In this rock relief monument, we see a triumphant king, adored by his subjects. In 244 AD, the Roman emperor Gordian III had been killed under or in connection with the war with the Persians, and his successor Philippus Arabs concludes a peace treaty with Shapur I and pays an enormous indemnity to the Persians to withdraw the army from a potentially disastrous situation. He owed his throne to King Shapur. Indeed, he was recognized as emperor by Shapur and the Senate. On this relief, we can see the dead Gordian underneath the victor's horse in the center of the scene. In front of the horse, we see Philip, kneeling and begging to be spared.
However, in 260, the same Sassanian king defeated another Roman emperor, Valerian, and had even taken him captive. Here, we see how the king has seized the captured emperor Valerian by the hand. (Zoom in to see the details!).
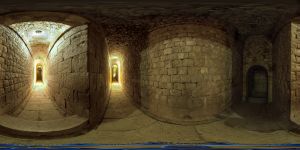
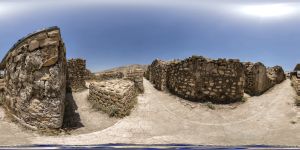
The corridors around the square courtyard of the structure, the så called Temple of Anahita.
The square must have been a pool, surrounded by sidewalks. The doors in the walls give access to a corridor that surrounded the square, and which in turn gave access to the place where the aqueduct reached this square building.
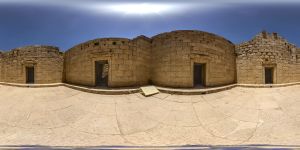
The building that is known as the Temple of Anahita, is in fact an unidentified structure, deeper than the other rooms of the palace. The structure, with its pleasant, harmonious dimensions, can only be reached by descending a long stairs. The water conduit in the shrine of Anahita. It is a building without parallel. Once you've descended the stairs, you will find yourself on a small square, surrounded by high walls. The square must have been a pool, surrounded by sidewalks. The doors in the walls give access to a corridor that surrounded the square, and which in turn gave access to the place where the aqueduct reached this square building.
|
|
|
|
|
|